We are almost an the entire way through Celiac Awareness Month and I have failed to post a single recipe.
Like many of you, this time of the year for my family of 7 is filled with sports events, end of the year concerts, talent shows, birthdays, holidays and more…
It is just a wee bit crazy.
But as someone with celiac who has spent the last several years trying to raise awareness, share recipes and make the transition from a gluten-full to a gluten-free life easier for others…not posting during this very important month is simply unacceptable!
So, if I were to wait this long to share a recipe, I knew it had to be a good one!
With that, I want to share a little bit of background to this recipe.
You see, gluten-free bread is something I have tinkered on and off with since my diagnosis, nearly 6 years ago.

And while my family is entirely gluten-free at home, and while 99.9% of our meals are grain-free, my children still appreciate the convenience and ‘normalcy’ a slice of bread offers them.
In the time since my diagnosis I have tried well over 100 different gluten-free bread recipes. Some have yeast, some didn’t; some had grains, many didn’t.
In the times when I attempted to perfect a grain-free, yeast-free bread recipe, my husband and gluten-eating children pleaded with me to make them something more ‘normal’.
So we bought bread. Gluten-free bread, but bread nonetheless.
Then I got tired of paying $5 or more for a very small loaf that would literally last my children one single day to eat.
I wanted to provide them with something more ‘normal’ in look, taste, texture; something that was more affordable and didn’t take 1000 ingredients to make.
So I continued to play.
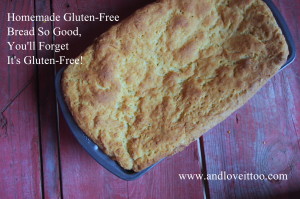
And then I nailed it!
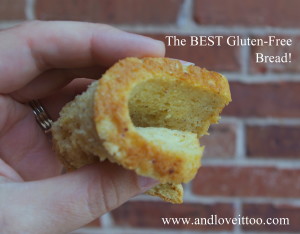
I made a bread so delicious, so noteworthy that my picky 12 year old gluten-loving nephew looked at me and said “This is really, really good Aunt Sunny! It tastes just like the (gluten-filled) bread my mom makes!”
Yes!
And I tested it, over and over, with several different “1:1” gluten-free flour mixes, learning that they all worked well in this recipe.
But I couldn’t just leave well enough alone…I had to put some effort into minimizing the number of grains in this recipe, because that is important to me and undoubtedly it will be important to some of you.
And you know what?
I perfected that, too!
Unfortunately removing the xanthan gum meant removing the very thing that made these recipes so much like their gluten-filled cousins…so while this isn’t completely grain-free, if your family can tolerate some corn, either one of these recipes is a great option for you!

Both of these breads have that glutinous stretch to them. When warm they both fold, move and cut exactly like you would expect gluten-filled bread to. Because these are larger loaves, they last longer and make for a heartier sandwich than store-bought gluten-free bread. Finally, the cost per loaf is approximately $2.50-$3.00 for the all-purpose GF flour recipe and approximately $4.00-$5.00 for the coconut flour recipe (the number of eggs in this one brings up our cost quite a bit, but given the high protein, high-fiber value of this bread, I am okay with that!). Considering we get almost double the sandwiches from these large loaves, the savings add up quickly!
We are very happy about these recipes!
I hope these recipes bring you many reasons to celebrate your gluten-free lifestyle.
Happy Celiac Awareness Month!


- !Yeast Starter
- 4c Warm Bottled Water (110 degrees Fahrenheit)
- 1 TBS Honey
- 4 ½ tsp Active Dry Yeast
- !Dry Ingredients
- 3 ½ c All Purpose Gluten-Free Flour (any 1:1 gluten-free replacement flour should work) (pour into the measuring cup, do not compact)
- 3 ½ c Tapioca Flour (pour into the measuring cup, do not compact)
- 2 TBS Potato Flakes
- 2 TBS Xanthan Gum
- 2 TBS Flaxseed Meal
- 4 tsp Salt
- !Wet Ingredients
- 6 Eggs (room temperature)
- ½ c Coconut Oil (Melted)
- 4 tsp Apple Cider Vinegar
- 2/3 c Honey
- Preheat Oven to 200f, then shut the oven off, leaving the door closed. You’ll use this to help your bread rise, it needs to be warm but not too hot. I find that this helps a lot.
- In a large bowl, mix together warm bottled water, honey and yeast. Allow to sit and proof 5-10 minutes while you mix the remainder of the ingredients. It should look foamy by the time you’re through.
- Using a stand mixer, slowly mix together the all-purpose gluten-free flour, tapioca flour, potato flakes, xanthan gum flaxseed meal and salt.
- In a separate large bowl, whisk together eggs, coconut oil, apple cider vinegar and honey.
- Slowly add in the wet ingredients to the dry ingredients, using setting 1 on your stand mixer. Once incorporated, slowly add in yeast and water mixture, turn your speed up to medium speed (about a 4 or 5) and allow to mix for about 4 minutes. The mixture will look like pancake batter.
- Spread batter evenly between two greased 9x5 loaf pans, then wet your hands and smooth the top of each loaf. Wetting your hands helps to prevent the batter from sticking to you and also prevents the loaves from getting dry during the rising process.
- Once batter is spread evenly and the tops have been smoothed down, gently place both loaves in the previously warmed oven. Allow to rise, undisturbed, for 60 minutes.
- Once loaves have risen, remove gently from the oven (avoid banging in any way, this can deflate the loaves), and pre-heat the oven to 375f.
- Bake in 375f oven for 45-55 minutes.
- Remove loaves from the oven, gently pull the warm bread from the pan and allow to cool thoroughly on a wire rack.
- Slice and serve.
- *Tip for slicing, turn the loaf upside down and slice that way. It keeps the top from smashing down.
- Makes approximately 20 ¼-inch slices.
- !Yeast Starter
- 4c Warm Bottled Water (110 degrees Fahrenheit)
- 1 TBS Honey
- 4 ½ tsp Active Dry Yeast
- !Dry Ingredients
- 1 3/4 c Coconut Flour (pour into the measuring cup, do not compact)
- 3 ½ c Tapioca Flour (pour into the measuring cup, do not compact)
- 2 TBS Potato Flakes
- 2 TBS Xanthan Gum
- 2 TBS Flaxseed Meal
- 4 tsp Salt
- !Wet Ingredients
- 12 Eggs (room temperature)
- ½ c Coconut Oil (Melted)
- 4 tsp Apple Cider Vinegar
- 2/3 c Honey
- Preheat Oven to 200f, then shut the oven off, leaving the door closed. You’ll use this to help your bread rise, it needs to be warm but not too hot. I find that this helps a lot.
- In a large bowl, mix together warm bottled water, honey and yeast. Allow to sit and proof 5-10 minutes while you mix the remainder of the ingredients. It should look foamy by the time you’re through.
- Using a stand mixer, slowly mix together the coconut flour, tapioca flour, potato flakes, xanthan gum flaxseed meal and salt.
- In a separate large bowl, whisk together eggs, coconut oil, apple cider vinegar and honey.
- Slowly add in the wet ingredients to the dry ingredients, using setting 1 on your stand mixer. Once incorporated, slowly add in yeast and water mixture, turn your speed up to medium speed (about a 4 or 5) and allow to mix for about 4 minutes. The mixture will look like pancake batter.
- Spread batter evenly between two greased 9x5 loaf pans, then wet your hands and smooth the top of each loaf. Wetting your hands helps to prevent the batter from sticking to you and also prevents the loaves from getting dry during the rising process.
- Once batter is spread evenly and the tops have been smoothed down, gently place both loaves in the previously warmed oven. Allow to rise, undisturbed, for 60 minutes.
- Once loaves have risen, remove gently from the oven (avoid banging in any way, this can deflate the loaves), and pre-heat the oven to 375f.
- Bake in 375f oven for 45-55 minutes.
- Remove loaves from the oven, gently pull the warm bread from the pan and allow to cool thoroughly on a wire rack.
- Slice and serve.
- *Tip for slicing, turn the loaf upside down and slice that way. It keeps the top from smashing down.
- Makes approximately 20 ¼-inch slices.


Sunny, this bread looks absolutely awesome! Folks are going to love having these options! Thanks so much. 🙂
Shirley
🙂 Thank you, Shirley! I appreciate you!!
When you state any gluten free flour mix 1:1 do you mean you mean you can use all brown rice flour or all sorghum flour? Since your’re adding 3 and 1/2 cups starch I assumed this is what you mean. I make my own flour mix and add the starch and xanthan gum. I’ve not seen this done before but I am going to try this, it’s so expensive to buy. Could this be used to make rolls? It would be nice to be able to get both from the same recipe!
🙂 Carol, this is a great question! I mean any pre-made gluten-free all purpose flour mix that has been identified as one that can (supposedly) replace wheat flour 1:1. I know adding in the extra starch and xanthan gum seems excessive but in my years of experimenting, it is necessary.
I made rolls by using this same mix in a muffin tin, they turned out great and were delicious as buns for mini burgers/sliders.
Please let me know how you enjoy this recipe! I look forward to hearing your review.
So which all purpose blend do YOU use Sunny? I would be curious! My experience is that their performance is all over the map….and no surprise since the protein, and starch ratios vary greatly. Will have to try a version of this! My kids are super picky about gf would be nice to have a cheaper option for sandwiches!
🙂 I’ve used this with the Cup4Cup, the Bob’s Red Mill and the Sam’s Gluten-Free All Purpose Blend. All worked well! Thank you for asking, Tessa! xoxo
Hello that sounds good . Can I take something else instead the potato flakes? Can’t find it here
Conny,
It would be worth trying the same measurement in potato starch or skinless baked potato. Please let me know how it turns out!!
xoxo,
Sunny
I tried making the recipe one, not sure what happened but it rose over the top of the pan and ran over, was my mix too thin? I followed it right except cut ingredients in half to make one load.
Hi Yolanda, what size was your pan? I have had it run over just once or twice, and usually because I put too much on one pan and not enough on the other. Best idea when you are baking anything that rises (or something like a pie) is to have a pan to capture drips underneath, just in case. Regardless, I hope your bread turned out delicious!
I’m curious why you recommend the use of bottled water?
With the state of plastic pollution in the world today i do my best to avoid bottled water, my well water is delicious and plentiful, so I will use that, but figure you must have some rationale for this recommendation?
Curiously,
Erica
Hi Erica! This is a great question! I suppose I should update the recipe to say bottled or filtered water as the major concern with using tap water is the way the chlorine can impact the yeast. Well water would work in place of bottled water as it isn’t riddled with the same chemicals that typical tap water is.
I hope that helps! Thank you for asking!
Sincerely,
Sunny