Today’s Healthy Lunchbox post comes from the highly energetic, absolutely adorable and simply wonderful Gluten-Free Gigi.
Because Gigi is nut-free, our styles vary a bit (as almond flour and nut cheeses are staples in my home). That being said, her gluten free, soy free, dairy free and nut free lifestyle has inspired many great meals and a number of fantastic goodies in my home (like her oh my goodness I want more Raw Nut Free Fudge; which is not just vegan and raw, it is sugar free and filled with natural, whole-food yumminess and something you will want to make time and time again!).
It is an honor to have an original Gigi creation on my site.
🙂
____________
What “The Cool (Gluten Free, Soy Free, Dairy Free, Nut Free) Mum” Packs in a Lunchbox
Having Sunny ask me to contribute a guest post about healthy lunchbox ideas was nothing less than an honor. “And Love It Too” is one of the food blogs I visit regularly. It’s kind of like recess to me… A sort of foodie playground where the friendly (and talented!) kids hang out.
I wanted to share a lunchbox treat worthy of Sunny and all the other awesome contributors for this series.
I considered my go-to “Sandwich on a Stick”. It’s the ultimate quick fix, but I wanted to go for something more creative than skewering deli meats and veggies.
I considered my flower-shaped Sunbutter Sandwiches with a hint of my Sugar-free Strawberry Naked Berry Bread Spread peeking through the cutout centers. Then I realized you already know how to use a flower-shaped cookie cutter on the nut-free version of PB&J.
What about a sweet treat?
I only have one school-age kiddo now. She’s 10 and truth is, she doesn’t eat cucumber slices or avocados. She likes apple slices with Sunbutter… Sometimes. She will grab a banana as a
snack… Most of the time. But that’s OK. When it comes to school lunches, we’re kind of lucky… We homeschool. Our “cafeteria” is always open and it’s dedicated gluten, dairy, soy, and nut free.
Among the kiddo’s friends, I’m known as “The Cool Mum Who Cooks”. It’s amusing. They know me for my treats and they visit my website, www.GlutenFreeGigi.com.
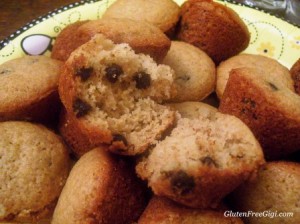
One of their most favorite snacks is one I’ve made but I’ve never shared the recipe… until today! I’ve decided to share it with Sunny, and with you! You deserve it! It’s Chocolate Chip
Mini-Muffins!
The recipe is one I adapted from a gluten-filled muffin recipe I made for my older daughter during her school years before my kitchen turned gluten free.
We enjoyed the recipe so much I decided to work on making it fit our special diet. I substituted alternative flours for wheat flour and eliminated a half cup of butter, replacing it with applesauce. I kept the sugar in, but reduced the amount called for in the original recipe. I also streamlined the technique. You don’t need a mixer and you don’t need more than one bowl. This is a “dump & stir” recipe that, if you really needed to, you could whip up for breakfast on a school morning. Seriously. It’s that simple.
So, how do these little muffins taste? Like delicate, soft chocolate chip cookies. The crumb is light and even, and it is impossible for anyone to eat just one. The recipe makes a large batch – enough to send a few for a lunchbox treat and leftovers to share (or freeze)! Later, you’ll be thankful you did!Enjoy!
Gluten Free Gigi’s Chocolate Chip Mini-Muffins (gluten, dairy, soy, and nut free)
Preheat your oven to 350 degrees. Lightly grease mini muffin pan(s). The recipe makes about 30 mini muffins.
1 cup white rice flour
1/4 cup sorghum flour
1/4 cup cornstarch (OR tapioca flour for corn allergy)
1/3 cup light brown sugar, firmly packed
1/3 cup white sugar
3/4 teaspoon baking soda
1 teaspoon baking powder
1/4 teaspoon fine sea salt
1 egg (OR egg replacer to equal 1 large egg for Vegan)
1/2 cup plain coconut milk yogurt
1/2 cup unsweetened applesauce
1 teaspoon vanilla extract
1/2 cup Enjoy Life Chocolate Chips
In a mixing bowl, combine first 8 ingredients (all dry ingredients). Stir with a whisk to combine. Add remaining ingredients and stir until the batter is evenly mixed. Spoon scant tablespoons of batter into each section of your muffin pan.
Bake muffins for 10-12 minutes, until tops spring back when lightly touched, or until muffins pass the “toothpick” test for doneness.
Enjoy with a glass of non-dairy milk! Store leftovers for up to 3 days tightly wrapped at room temperature, or freeze for up to 1 month.
Make these little jewels this week and I guarantee you’ll become known as a “cool mum” and be amused by it too!
xo,
Gluten Free Gigi


I love Gigi! Her mini muffins look great. Who can resist chocolate chips? Whenever I make a muffin, almost without fail, someone says, these look (or are) terrific, but they’d be ever better if you added chocolate chips! LOL Cool Mum indeed! 😉 Mini versions always rule IMHO!
Thanks, Sunny and Gigi! xo,
Shirley
Sunny,
Thank you so much for having me as your guest! You already know that I love your site, so this is an honor for me! This series is so helpful to parents of kids with food allergies for healthy, tasty ideas! You’re awesome for hosting!!!
xoxo,
Gigi 😉
Gotta love a lunch that can double as dessert! These look great. 🙂