If you have followed me for any time now, heck, if you followed me just over the last month, there should be no doubt how much I adore my friend Shirley Braden.
And I do.
So when Shirley hesitated to join this year’s Healthy Lunchbox series, no matter how much I understood, I was honestly a little sad. Then somehow, some way she decided to join in…and after reading her very open, honest and insightful post, I am so glad she did!
Showing just how easy a gluten-free lifestyle should be, please enjoy this Healthy Lunchbox post from Ms. Gluten-Free Easily herself.
Thanks, Shirley! Xo
_____________________________________
Then and Now: What I Fed My Child Back in the Day & What I’d Feed Him Now
When Sunny first asked me to join in this year’s Healthy Lunchbox 2012 series, I hesitated. As she well knew, I had participated in her series last year with my post on The Cagey Bachelor Philosophy … A Tapas Approach to School Lunches. I told Sunny that I didn’t know what more I could offer. But then I kept thinking about the lunches that I had packed for Son when he was growing up. (He’s now 24 years old and off living on his own in New York City.) The lunches I packed for him were not healthy. Oh, don’t get me wrong, I actually thought that I was doing pretty well back then, but I was ignorant about what constituted a healthy lunch. Very ignorant in fact. I actually packed healthier lunches for myself because mine involved leftovers from meals made from real food. Those were often not a good option for Son’s lunch as there was no way for him to heat up his lunches. Sure, some leftovers could be packed in a thermos and kept warm, but for the most part I relied on packaged individual serving items for his lunches. Let’s break them down, shall we?
Yogurt ~
Then: Son, who is now dairy free in addition to being gluten free, used to love yogurt. But it was the yogurt with the colorful packaging and cute cartoon characters that was pretty colorful itself. It was full of sugar (or the even less desirable aspartame or sucralose), dyes, and preservatives. Not good at all.
Now: If I were packing Son’s lunch today, I’d make my own yogurt, adding fruit. If I needed dairy free yogurt, I could use one of the many dairy-free milks to make my own yogurt. There are many terrific recipes for making yogurt online. Here are links to just a few.
Katie (Kitchen Stewardship) (In this post, Katie also addresses all the excuses on not making one’s own yogurt.)
Kelly (The Spunky Coconut) (using cashew milk here and both cashew and coconut milk here)
Lexie (Lexie’s Kitchen) (almond and hemp milk yogurt, almond milk yogurt, and coconut milk yogurt)
Stephanie (A Year of Slow Cooking)
Cheese ~
Then: Cheese sticks were just so much fun back then, but after a while even Son noticed that daily cheese sticks were, well, to put it bluntly, clogging him up.
Now: Today, I’d skip the cheese most days, but occasionally would include a very small square of high quality cheese. For dairy free, a small piece of the Daiya wedges would work.
Fruits ~
Then: I went for single servings of fruits like applesauce (with sugar and cinnamon added), peaches, and fruit cocktail. I’d occasionally cut up an apple or a pear, but they did tend to turn brown by lunch time. I didn’t want to use the commercial product that keeps fruit from turning brown, nor did I want to use orange juice or lemon juice on the fruit slices because although those will work to prevent a color change, they also subtly change the color.
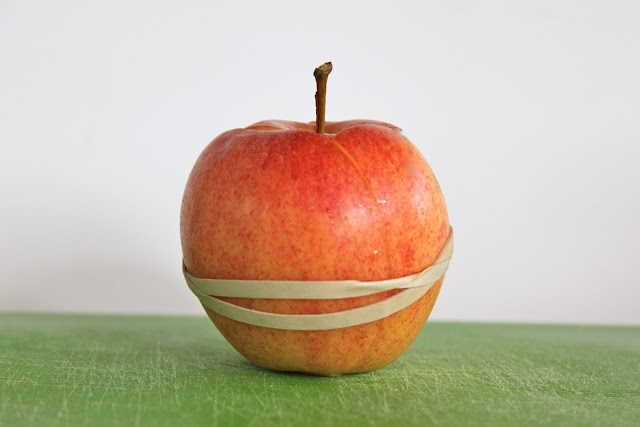
Now: I’d add fresh fruit all the time for lunch.Thanks to Pinterest, I know about the “apple puzzle” solution. With your apple standing upright, cut apple into vertical slices and then secure all with a rubber band so the surface of the slices won’t oxidize and turn brown. See Smashed Peas and Carrots’ step-by-step instructions here.
Meats, Main Dish ~
Then: Jerky was a favorite “go to” lunch item. Full of preservatives, the jerky and “meat sticks” I packed for Son were not at all a good choice. Leftovers were used if they didn’t require re-heating or could be added to a thermos. I also relied on canned and microwaveable goods.
Now: Making jerky is a great reason to have a dehydrator. Here’s a recipe for Ginger Tamari Jerky from Paleo Parents. Soup (like Everything Soup; Potato-Zucchini Soup; Black Bean, Corn, and Salsa Soup; or Black-Eyed Pea with Ham, and Chicken Soup)—with a savory muffin, paleo bread, or crackers—makes for an easy-to-make filling meal with the help of a thermos. Similarly, small portions of leftover casseroles (like Easy Pea-sy Cheesy Tuna or Salmon Casserole, Spicy Sausage with Russet Potatoes and Sweet Potato Crea Sauce, and Taco Popover Supper) can easily be taken for lunch in a thermos. Remember to always fill the thermos with hot water, let sit for a few minutes, and then empty and fill to ensure thermos does its job best.
Granola Bars/Cereal Bars/Protein Bars ~
Then: I bought a lot of pre-packaged cereal bars and granola bars for son’s lunches. For the most part, they provided little nutritional value and, in hindsight, didn’t excel in the flavor department either.
Now: I would make some pretty healthy bars (focusing on ingredients like nuts, oats, quinoa flakes), for a treat once or twice a week. Popeye Protein and Fruit Bars, Chewy Granola Bars, or Black Magic Bars would all make welcome lunch box treats. Most of my bar recipes can even be frozen on a wax-paper lined baking sheet and then stored in a larger container and pulled out one at a time as needed.
Crackers ~
Then: Sometimes packaged sandwich crackers made their way into Son’s lunch box. You know those day-glow orange ones that came with peanut butter or cheese centers? Those were the ones. Obviously they contained food coloring, but they also contained both wheat flour and barley flour, one or more undesirable oils, and more.
Now: There are a few purchased healthy gluten-free crackers that I buy from time to time, so I’d be willing to use those occasionally. But I’d like to try other ideas like these Roasted Red Pepper Fruit Leather pieces that make great natural crackers, or Ali’s Quinoa-Seed Crackers, Elana’s Vegan Herb Crackers, or Maggie’s Sesame Almond Crackers.
Chips ~
Then: Yep, I included packaged chips all the way. Son’s favorites were those stackable, thin, “formed” chips. It turns out they aren’t even gluten free as most chips are.
Now: There are some healthier chips on the market today (I especially like the veggie chips, like sweet potato, beet, etc.) and I’m sure that I’d still share some packaged ones from time to time, but it’s pretty easy to make one’s own potato chips like Karina shows here. Or you could not go wrong with these yellow squash chips, which Jen’s kids fought over, if your child’s school starts while yellow squash is still in season. Zucchini chips are another great chip option and zucchini seems to be around longer during the year. These Zucchini Chips from Alyssa look perfect for a kid’s lunch. And you’ve now happily crossed over into the Veggies category!
Veggies ~
Then: Unless veggies were included in leftovers packed in thermoses, sadly, few veggies made it into Son’s lunch.
Now: I did pack raw carrots from time to time, but later information revealed that the baby carrots that I packed were not healthy at all. A “go to” lunch with an emphasis on veggies would be hummus (in different flavors) with cut red pepper strips, cucumber sticks (or slices), and similar.
Cookies ~
Then: Okay, I never ever bought cookies or muffins for Son. I always made my own. Baking has always been my specialty, but I was only focused on making tasty baked goods before. I didn’t give a second thought to ingredients. I made cookies and muffins with highly refined gluten-full flour, refined sugar, lots of chocolate chips, etc.
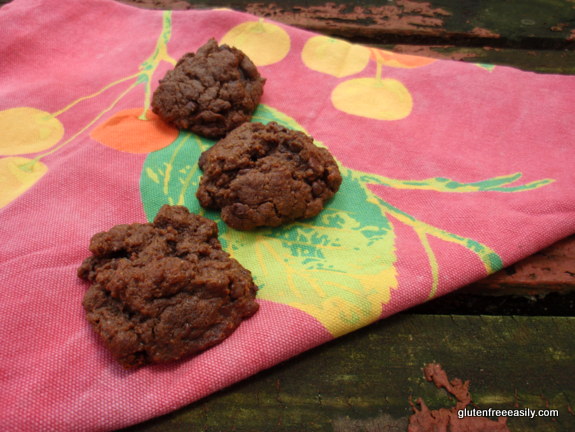
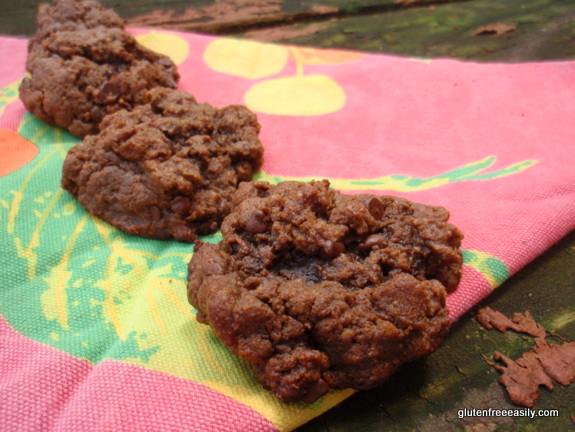
Now: I still make cookies but focus more on nutritionally dense ingredients like nut butter, nut flour, unrefined sweeteners (honey from our own bees—which I only used in place of pancake syrup back in the day, Grade B maple syrup, and coconut or palm sugar.) Today’s recipe for Double Chocolate Nut Butter Oat Breakfast Cookies—at the bottom of this post—is an example of the cookies I make today. Nut butter, eggs, oat flour, cocoa powder (or raw cacao powder), coconut sugar, allergen-free chocolate chips, coconut oil, baking soda, and homemade vanilla extract come together to create soft, moist, and filling healthier chocolate cookies.
Beverages ~
Then: I was trained by television commercials, ads, and soccer game fare to always provide a beverage like milk (yes, chocolate), sports drink, juice pack, or juice. So I always had those for Son. A bright orange “Sunny” beverage was a favorite of his. The ingredients were several juices (that constituted less than 2% volume), corn syrup, canola oil, food coloring, sucralose, gums, and preservatives. Yikes.
Now: I’d focus first and foremost on filtered water. From home. In a recyclable container. If I wanted Son to enjoy some milk, I’d go for a non-dairy milk (I love this easy recipe from Ricki for making one’s own hemp milk and this way of making almond milk from Eat to Evolve), healthy juice (as in all juice and not a juice-pack), or even a smoothie. If Son wanted a pretty cold drink, I’d include Lexie’s Cool-Aid. Putting the beverage in the lunch in a frozen state should result in a cold, drinkable beverage by lunch time.
Making healthy lunches when you are making a lot of the foods yourself does take a little preplanning and preparation, storage, and packaging time, of course. But it doesn’t have to take tons of time. A once-a-week effort–and a fairly modest amount of time spent–can produce a whole week’s worth of lunch components!
Here’s my recipe for healthier lunch box cookies:
Chocolate Nut Butter Oat Cookies
1 cup nut butter (or sun butter)
1/3 cup oat flour
¼ cup cocoa powder (or raw cacao powder)
¾ to 1 cup coconut sugar (or palm sugar, to taste; may even use less)
2 eggs, slightly beaten
1 tbsp coconut oil (if needed; see notes)
1 tsp baking soda
½ tsp vanilla extract
¼ to ½ cup Enjoy Life chocolate chips
Preheat oven to 350 degrees Fahrenheit. Line baking sheets with parchment paper.
Add ingredients to large mixing bowl in order shown, adding chocolate chips after other ingredients are mixed well.
Drop cookies by heaping tablespoonful onto baking sheets, about one inch apart. (The cookies will not spread much during baking.)
Bake for about 8 to 10 minutes, until cookies appear set. Remove baking sheets from oven and let cookies stand on baking sheets for 10 minutes longer. They will continue to bake during this time.
Remove to drying rack to cool.
Makes about 24 3-inch cookies.
Shirley’s Notes: Only add coconut oil if the mixture seems too dry to make drop cookies. For example, I added coconut oil when using natural peanut butter, but did not add coconut oil when using almond butter.


I love this before and after post! So very useful and informative. I think it is a great way to show people how you can actually transition from a Standard American Diet to a truly healthy whole foods based one, with lots of delicious options. Thank you Shirley for sharing, even though you were uneasy about it. I think it can help a lot of people! And thanks Sunny for hosting
Shirley this is a great post! You’ve totally inspired me to have a little more fun in the kitchen with my kid’s school lunches. Thank you for sharing the apple tip! And my cracker recipe 🙂 I’m so glad you were able to share your lunchbox wisdom with Sunny’s readers.
xo
Thanks for your BEYOND sweet words, Sunny! Back at you, dear! 🙂
I am honored that you invited me to take part in this wonderful event, and relieved that I came up an idea!! 😉
xo,
Shirley
What a great post! I’m so glad that Shirley decided to do it because she obviously has a lot to contribute. Those links are invaluable.
You guys are all so sweet!! When I left my comment, I couldn’t see your comments as they hadn’t been approved by Sunny yet. I’m so happy that you felt my post was so worthwhile. 🙂
Hugs to all!
Shirley